Maximizing Your Holiday Crafting with the Smiley Christmas Treat Box Set SVG
The holiday season often brings a rush of creative energy, but it also introduces tight deadlines and high expectations for finished products. Whether you are a small business owner preparing inventory for a craft fair, a teacher organizing classroom parties, or a parent looking to add a personal touch to neighbor gifts, efficiency is just as important as aesthetics. The Smiley Christmas Treat Box Set SVG offers a streamlined solution for these needs, providing a cheerful collection of four character-themed containers designed to hold holiday goodies. Each box features a friendly, smiling face that adds a whimsical, personalized touch without requiring advanced illustration skills. However, simply downloading a file does not guarantee a perfect result. Many crafters overlook critical details regarding file types, material selection, and assembly workflows, leading to wasted materials and frustration. Understanding how to properly utilize this specific design set can mean the difference between a professional-looking product and a flimsy prototype.
Understanding the File Formats and Workflow Options
One of the most common misunderstandings when purchasing digital cut files involves the distinction between standard and layered SVGs. The Smiley Christmas Treat Box Set SVG includes both options, yet users frequently select the wrong one for their specific machine or workflow, causing unnecessary complications. If you are using a machine that supports a "Print then Cut" workflow, such as certain models from Cricut or Silhouette, the included layered SVG files are your best friend. These allow for a quick setup where you print the colors directly onto cardstock and then cut the outline. This method saves time on weeding and layering different colors of paper.
Conversely, if you prefer cutting from solid colored cardstock, you must utilize the standard SVG files. A frequent mistake here is attempting to use the layered file for multi-color cardstock assembly without separating the elements first. This can lead to confusion in the design software, resulting in cut lines that do not align with the intended color blocks. Before you start cutting, take a moment to evaluate your preferred method. If you enjoy the tactile process of gluing different paper layers together, stick to the standard files. If speed and gradient effects are your priority, leverage the Print then Cut capability. Ignoring this distinction often results in hours of troubleshooting in your design software rather than actual crafting.
Material Selection and Structural Integrity
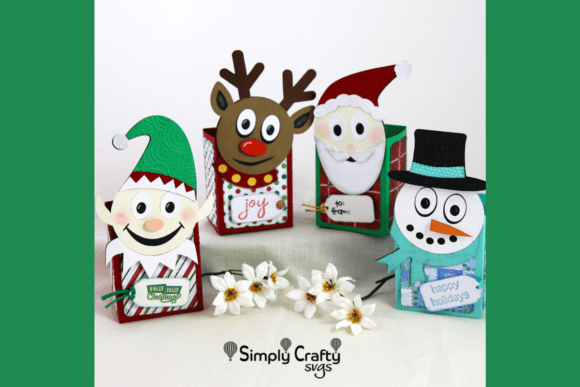
Another area where crafters often stumble is material choice. The finished dimensions of each individual box in this set are 2.75″ x 2″ x 6.5″. While these dimensions are perfect for holding cookies, candies, or small trinkets, they require a specific type of paper to maintain their shape. A common error is using standard printer paper or lightweight scrapbook paper (under 65 lb) for the structural components. Because these boxes are tall and relatively narrow, lightweight paper will cause the sides to bow outward once filled, ruining the crisp look of the character faces.
To avoid this, always opt for heavy cardstock, ideally between 80 lb and 110 lb. This weight provides the necessary rigidity to keep the Snowman, Santa, Reindeer, and Elf faces flat and recognizable. Furthermore, consider the score lines. Most cutting machines allow you to switch blades or adjust pressure to create score lines instead of cut lines for folds. Skipping the scoring step and simply folding heavy cardstock can lead to cracked fibers and unsightly white creases along the fold lines, which detracts from the professional finish. Taking the extra minute to set up a scoring tool ensures sharp, clean corners that enhance the overall presentation of your gift.
Leveraging Compatibility and Customization
Versatility is a key selling point of this collection, yet many users fail to maximize its potential. The characters in the Smiley Christmas Treat Box Set are fully compatible with the Smiley Halloween Treat Box Set. This cross-compatibility is a goldmine for entrepreneurs and avid hobbyists who want to expand their product line without learning new software or adjusting settings. You can swap boxes and characters to create hybrid designs or offer variety packs. For instance, creating a "Holiday Transition" bundle that includes both spooky and festive characters can appeal to customers looking for year-round crafting solutions. Overlooking this compatibility limits your creative output and potential market reach.
Additionally, the set includes a blank tag design. It is crucial to note that while example images may show specific sentiments or phrases, these are not part of the actual file. A frequent oversight is assuming the text is editable or included, leading to confusion upon download. The blank tag is intentionally left empty to allow for complete customization. Use this to your advantage by adding handwritten names, stamped dates, or custom vinyl decals. This flexibility allows you to tailor the gift to the recipient, adding a level of personalization that pre-printed boxes cannot match. Whether you are branding these for a business or making them for family, the blank tag is your canvas for communication.
Navigating Assembly Without Video Tutorials
It is important to address the lack of a video tutorial for this product. In an era where visual guides are ubiquitous, some users feel hesitant to purchase files that rely solely on written instructions. However, the absence of a video should not be seen as a drawback but rather as an opportunity to develop independence with the provided resources. The Smiley Christmas Treat Box Set SVG comes with a downloadable PDF containing step-by-step instructions. A common mistake is skipping the PDF entirely and guessing the assembly order based on intuition. This often leads to tabs being glued on the outside of the box or faces being attached upside down.
To ensure success, download the PDF immediately after purchase and review it before cutting your first sheet of paper. The instructions will clarify the sequence of folding and adhering, ensuring that the internal tabs are hidden and the structural integrity is maintained. For beginners, it is highly advisable to create a "prototype" using cheap copy paper first. This dry run allows you to familiarize yourself with the tab locations and folding mechanics without risking expensive holiday cardstock. Once you understand the logic of the assembly through the PDF guide, moving to the final material becomes a smooth, confident process.
Making the Right Choice for Your Projects
Before committing to a large batch of these treat boxes, evaluate your specific goals. Are you looking for speed, or is the crafting process itself the goal? If you need to produce fifty boxes for a school event, the Print then Cut method with the layered files is the most efficient route. If you are hosting a crafting party where the activity is the focus, the standard SVG files and solid cardstock provide a more engaging experience for participants. By aligning your file choice and material strategy with your end goal, you prevent waste and ensure satisfaction.
The Smiley Christmas Treat Box Set SVG is a robust tool for holiday creativity, offering four distinct characters that bring joy to any setting. By paying attention to file formats, choosing the correct cardstock weight, utilizing the cross-set compatibility, and respecting the written assembly instructions, you can elevate your projects from simple crafts to polished, professional gifts. Avoid the pitfalls of assumption and rushed preparation; instead, approach your crafting with a plan. This mindful approach ensures that every Snowman, Santa, Reindeer, and Elf you create stands tall, smiles bright, and delivers your holiday treats with style.